Tag: proliant

HP Proliant: Device is reporting an internal degraded status

When you see an exclamation mark next to the blade server, verify the server hardware
DeviceBays
First click on the server device bay and check its status
Degraded
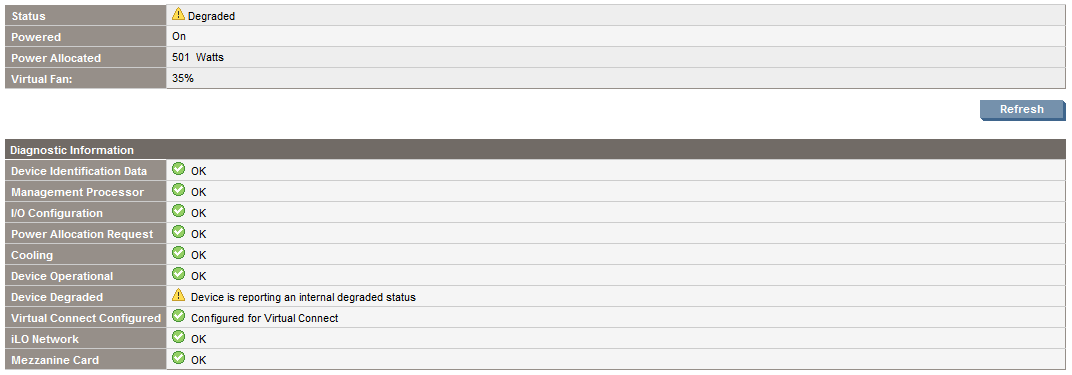
If it shows Device is reporting an internal degraded status, first upgrade the iLO firmware. Then verify if it was solved.

If not, verify if there is a faulty disk in the disk array with hpacucli ctrl all show config

root@linux:~ # hpacucli ctrl all show config

Smart Array P400i in Slot 0 (Embedded) (sn: )

array A (SAS, Unused Space: 0 MB)

logicaldrive 1 (136.7 GB, RAID 1, OK)

physicaldrive 1I:1:1 (port 1I:box 1:bay 1, SAS, 146 GB, OK)
physicaldrive 1I:1:2 (port 1I:box 1:bay 2, SAS, 146 GB, OK)

Install hpasmcli. Part of HP System Health Application and Command Line Utilities (hp-health)

root@linux:/tmp # rpm -ivh hp-health-9.40-1602.37.sles10.x86_64.rpm
Preparing… ########################################### [100%]
1:hp-health ########################################### [100%]
Please read the Licence Agreement for this software at

/opt/hp/hp-health/hp-health.license

By not removing this package, you are accepting the terms
of the “HP Proliant Essentials Software End User License Agreement”.
Using Proliant Standard
IPMI based System Health Monitor
Using standard Linux IPMI device driver
Starting ipmi drivers: done
Starting Proliant Standard
IPMI based System Health Monitor (hpasmlited):
done

Starting HP Advanced Server Recovery Daemon done
The hp-health RPM has installed successfully.

Start hpasmcli

root@linux:~ # hpasmcli
HP management CLI for Linux (v2.0)
Copyright 2008 Hewlett-Packard Development Group, L.P.

————————————————————————–
NOTE: Some hpasmcli commands may not be supported on all Proliant servers.
Type ‘help’ to get a list of all top level commands.
————————————————————————–

Another component that usually gives problem is a Memory DIMM.

hpasmcli> show dimm
DIMM Configuration
——————
Cartridge #: 0
Module #: 1
Present: Yes
Form Factor: fh
Memory Type: OTHER(14h)
Size: 4096 MB
Speed: 667 MHz
Supports Lock Step: No
Configured for Lock Step: No
Status: Ok

Cartridge #: 0
Module #: 2
Present: Yes
Form Factor: fh
Memory Type: OTHER(14h)
Size: 4096 MB
Speed: 667 MHz
Supports Lock Step: No
Configured for Lock Step: No
Status: Ok

Cartridge #: 0
Module #: 3
Present: Yes
Form Factor: fh
Memory Type: OTHER(14h)
Size: 4096 MB
Speed: 667 MHz
Supports Lock Step: No
Configured for Lock Step: No
Status: Ok

Cartridge #: 0
Module #: 4
Present: Yes
Form Factor: fh
Memory Type: OTHER(14h)
Size: 4096 MB
Speed: 667 MHz
Supports Lock Step: No
Configured for Lock Step: No
Status: Ok

Cartridge #: 0
Module #: 5
Present: Yes
Form Factor: fh
Memory Type: OTHER(14h)
Size: 4096 MB
Speed: 667 MHz
Supports Lock Step: No
Configured for Lock Step: No
Status: Ok

Cartridge #: 0
Module #: 6
Present: Yes
Form Factor: fh
Memory Type: OTHER(14h)
Size: 4096 MB
Speed: 667 MHz
Supports Lock Step: No
Configured for Lock Step: No
Status: DIMM is degraded

Cartridge #: 0
Module #: 7
Present: Yes
Form Factor: fh
Memory Type: OTHER(14h)
Size: 4096 MB
Speed: 667 MHz
Supports Lock Step: No
Configured for Lock Step: No
Status: Ok

Cartridge #: 0
Module #: 8
Present: Yes
Form Factor: fh
Memory Type: OTHER(14h)
Size: 4096 MB
Speed: 667 MHz
Supports Lock Step: No
Configured for Lock Step: No
Status: Ok

Cartridge #: 0
Module #: 9
Present: Yes
Form Factor: fh
Memory Type: OTHER(14h)
Size: 4096 MB
Speed: 667 MHz
Supports Lock Step: No
Configured for Lock Step: No
Status: Ok

Cartridge #: 0
Module #: 10
Present: Yes
Form Factor: fh
Memory Type: OTHER(14h)
Size: 4096 MB
Speed: 667 MHz
Supports Lock Step: No
Configured for Lock Step: No
Status: Ok

Cartridge #: 0
Module #: 11
Present: Yes
Form Factor: fh
Memory Type: OTHER(14h)
Size: 4096 MB
Speed: 667 MHz
Supports Lock Step: No
Configured for Lock Step: No
Status: Ok

Cartridge #: 0
Module #: 12
Present: Yes
Form Factor: fh
Memory Type: OTHER(14h)
Size: 4096 MB
Speed: 667 MHz
Supports Lock Step: No
Configured for Lock Step: No
Status: Ok

Cartridge #: 0
Module #: 13
Present: Yes
Form Factor: fh
Memory Type: OTHER(14h)
Size: 4096 MB
Speed: 667 MHz
Supports Lock Step: No
Configured for Lock Step: No
Status: Ok

Cartridge #: 0
Module #: 14
Present: Yes
Form Factor: fh
Memory Type: OTHER(14h)
Size: 4096 MB
Speed: 667 MHz
Supports Lock Step: No
Configured for Lock Step: No
Status: Ok

Cartridge #: 0
Module #: 15
Present: Yes
Form Factor: fh
Memory Type: OTHER(14h)
Size: 4096 MB
Speed: 667 MHz
Supports Lock Step: No
Configured for Lock Step: No
Status: Ok

Cartridge #: 0
Module #: 16
Present: Yes
Form Factor: fh
Memory Type: OTHER(14h)
Size: 4096 MB
Speed: 667 MHz
Supports Lock Step: No
Configured for Lock Step: No
Status: Ok

hpasmcli>

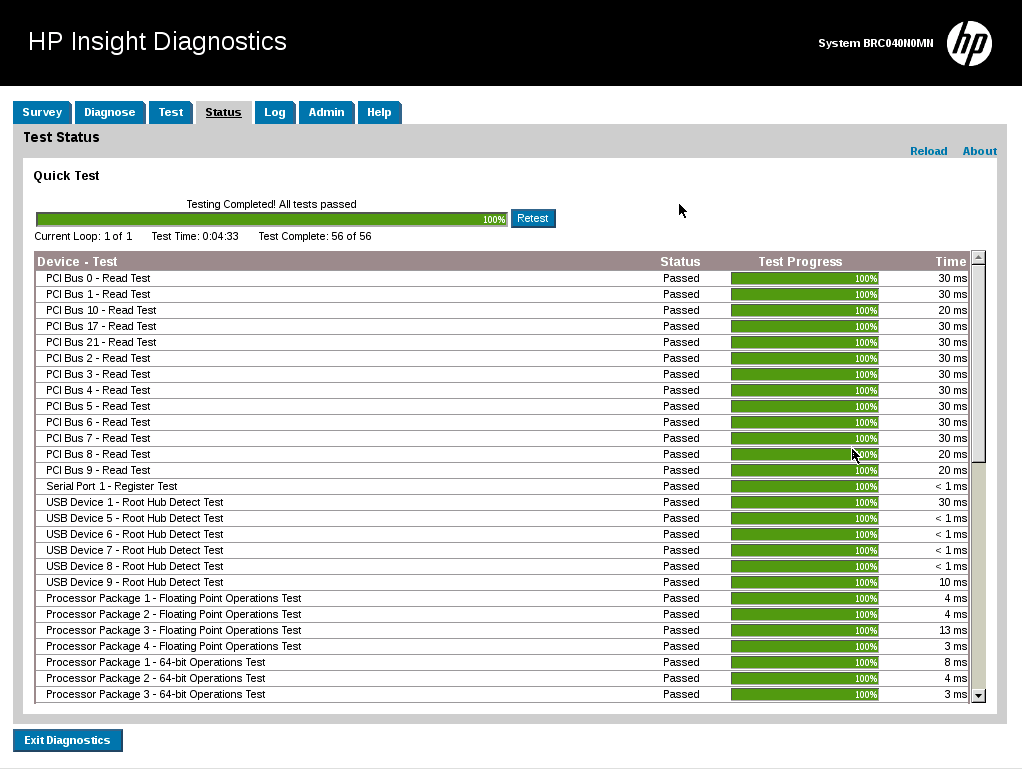
After this, you’ll have to run diagnostics using HP Insight Online Diagnostics that you installed on the operating system or boot with the CD/DVD to run the HP Insight Offline Diagnostics

Configure HP Remote Insight Lights-Out Edition II Board (RILOE II) – ILO 1

In an HP Proliant DL380 G3 I had an older iLO.
riloeII

This version is also called Remote Insight Lights-Out Edition II Board (RILOE II)
User guide for HP Remote Insight Lights-Out Edition II Board

The ROM-based setup utility F8 (RBSU F8) allows you to configure RILOE II during server boot-up. RBSU F8 is useful for configuring servers that do not use DNS/DHCP. RBSU F8 is available every time the server is booted. RBSU F8 cannot run remotely.

06

HP Insight Diagnostics Offline – Hardware verification on HP Proliant Servers

To run this utility, launch the SmartStart CD. Download the ISO and run it from Virtual Media or burn a CD
HP SmartStart 8.40 CD x32 for HP Proliant G3 or older
HP SmartStart 8.70 (B) CD x64

Also available on HP SPP
HP Service Pack for ProLiant (SPP) Version 2014.06.0

This is the last SPP release to support G5 generation and earlier servers.
This is the final SPP release that will contain support for Red Hat Enterprise Linux 5. Future SPP releases will not contain support for Red Hat Enterprise Linux 5

HP Smart Start

SmartStart02

SmartStart03

SmartStart04

SmartStart05

SmartStart06

SmartStart07

HP SPP

spp01

spp02

spp03

spp04

spp05

HP Proliant BL680C G5 and G7 – Change serial number back to old one

HP Proliant BL680C G5
Select User guide (27)
And then ProLiant BL680c Generation 5 Server Blade User Guide page 53

HP Proliant BL680C G7
Select User guide (22)
And then ProLiant BL680c Generation 7 Server Blade User Guide page 84 / 85

Re-entering the server serial number and product ID
After you replace the system board, you must re-enter the server serial number and the product ID.
1. During the server startup sequence, press the F9 key to access RBSU.
2. Select the System Options menu.
3. Select Serial Number. The following warning is displayed:
WARNING! WARNING! WARNING! The serial number is loaded into the system
during the manufacturing process and should NOT be modified. This option
should only be used by qualified service personnel. This value should
always match the serial number sticker located on the chassis.
4. Press the Enter key to clear the warning.
5. Enter the serial number and press the Enter key.
6. Select Product ID.
7. Enter the product ID and press the Enter key.
8. Press the Esc key to close the menu.
9. Press the Esc key to exit RBSU.
10. Press the F10 key to confirm exiting RBSU. The server will automatically reboot.

This is the official instructions in the manual. I applied the following steps:

1 – Advanced Options

RBSU 1 Serial Number

2 – Serial Number

RBSU 2 Serial Number

3 – Inserting the new one and then exiting

RBSU 3 Serial Number

Update HP iLO Firmware on HP Proliant

To update the HP iLO, go to this page http://h18013.www1.hp.com/products/servers/management/iloadv3/index.html and under the section Products Firmware and Tools, click on the version that your server has and download the firmware.

Download the file according to your Operating System. My OS is a Red Hat Enterprise Linux 5, so I downloaded the file and then copied to the server.

iLO 1 v.1.96 – CP023365.scexe
iLO 2 v.2.29 – CP027871.scexe
iLO 3 v.1.20 – CP014002.scexe
You first need to have at least iLO 3 version 1.20 to update to later versions
iLO 3 v.1.85 – CP026424.scexe
iLO 4 v.2.30 – CP026236.scexe

To update, you run the file as shown below

root@linux:/tmp # bash ./CP018561.scexe

FLASH_iLO3 v1.09 for Linux (Jan 23 2013)
(C) Copyright 2002-2013 Hewlett-Packard Development Company, L.P.
Firmware image: ilo3_155.bin
Current iLO 3 firmware version 1.26; Serial number ILOBRC14004X5

Component XML file: CP018561.xml
CP018561.xml reports firmware version 1.55
This operation will update the firmware on the
iLO 3 in this server with version 1.55.
Continue (y/N)?y
Current firmware is 1.26 (Aug 26 2011 )
Firmware image is 0x801664(8394340) bytes
Committing to flash part…
******** DO NOT INTERRUPT! ********
Flashing is underway… 67 percent programmed. –

After the flashing finishes, wait a few minutes for iLO to restart

******** DO NOT INTERRUPT! ********
Flashing completed.
Attempting to reset device.
Succeeded.
***** iLO 3 reboot in progress (may take up to 60 seconds.)
***** Please ignore console messages, if any.
iLO 3 reboot completed.

If the update fails, follow the instructions on this page Error when updating iLO2 in HP Proliant to unpack the files in the self-executable and try to update the iLO using the web interface.

Checking the hard drive model in an HP Smart Array

To discover the model of the hard drive that is in an HP Smart Array, type the following command

root@linux:~ # hpacucli ctrl all show config detail

Smart Array P400i in Slot 0 (Embedded)
Bus Interface: PCI
Slot: 0
Serial Number:
Cache Serial Number: PA82C0H9SV5DJS
RAID 6 (ADG) Status: Disabled
Controller Status: OK
Chassis Slot:
Hardware Revision: Rev D
Firmware Version: 7.22
Rebuild Priority: Medium
Expand Priority: Medium
Surface Scan Delay: 15 secs
Post Prompt Timeout: 0 secs
Cache Board Present: True
Cache Status: OK
Accelerator Ratio: 100% Read / 0% Write
Drive Write Cache: Disabled
Total Cache Size: 256 MB
No-Battery Write Cache: Disabled
Battery/Capacitor Count: 0
SATA NCQ Supported: True

Array: A
Interface Type: SAS
Unused Space: 0 MB
Status: Failed

Logical Drive: 1
Size: 136.7 GB
Fault Tolerance: RAID 1
Heads: 255
Sectors Per Track: 32
Cylinders: 35132
Stripe Size: 128 KB
Status: Interim Recovery Mode
Array Accelerator: Enabled
Unique Identifier: 600508B100184839535635444A530004
Disk Name: /dev/cciss/c0d0
Mount Points: /boot 1.0 GB
Logical Drive Label: A01123B864C1
Mirror Group 0:
physicaldrive 1I:1:1 (port 1I:box 1:bay 1, SAS, 146 GB, OK)
Mirror Group 1:
physicaldrive 1I:1:2 (port 1I:box 1:bay 2, SAS, 0 MB, Failed)

physicaldrive 1I:1:1
Port: 1I
Box: 1
Bay: 1
Status: OK
Drive Type: Data Drive
Interface Type: SAS
Size: 146 GB
Rotational Speed: 10000
Firmware Revision: HPDC
Serial Number: 3NM7VLAB00009915WTN0
Model: HP DG146BB976
PHY Count: 2
PHY Transfer Rate: 3.0GBPS, Unknown
physicaldrive 1I:1:2
Port: 1I
Box: 1
Bay: 2
Status: Failed
Drive Type: Data Drive
Interface Type: SAS
Size: 0 MB
Firmware Revision: HPDC
Serial Number: READ_CAPACITY FAILED
Model: HP DG146BB976
PHY Count: 1
PHY Transfer Rate: Unknown

This will be handy when you have to replace a faulty disk

root@linux:~ # hpacucli ctrl all show config

Smart Array P400i in Slot 0 (Embedded) (sn: )

array A (SAS, Unused Space: 0 MB)

logicaldrive 1 (136.7 GB, RAID 1, Interim Recovery Mode)

physicaldrive 1I:1:1 (port 1I:box 1:bay 1, SAS, 146 GB, OK)
physicaldrive 1I:1:2 (port 1I:box 1:bay 2, SAS, 0 MB, Failed)

This can be of interest – HP/Compaq Hard Disk Drives – Hard Drive Model Number Matrix

Fencing agent ipmi_ilo incompatible with Red Hat Cluster and HP iLO3

I have a two node Red Hat Cluster with HP Proliant servers.

This server has an HP iLO3 for Out-of-band management.

The fence_ilo agent works with iLO and iLO2.
Fence Device and Agent Information for Red Hat Enterprise Linux

You will need to use fence_ipmplan agent with the recommended settings following this Red Hat document:
How do you configure the fence device agent information option for the HP ILO 3?

hpacucli – Error: Another instance of ACU is already running (possibly a service)

If you receive this error message

root@linux:~ # /usr/sbin/hpacucli
HP Array Configuration Utility CLI 8.70-8.0
Detecting Controllers…

Error: Another instance of ACU is already running (possibly a service). Please
terminate the ACU application before running the ACU CLI. Press ENTER to
exit.

But there is no process running

root@linux:~ # ps -ef | grep -i acu
root 4805 32086 0 10:00 pts/0 00:00:00 grep -i acu

Delete all files on /opt/compaq/cpqacuxe/bld/locks to solve this problem

root@linux:/opt/compaq/cpqacuxe/bld/locks # ls
. .. CPQACU_MUTEX

In another occasion, solved this problem by deleting file /dev/shm/sem.hpacu.appLock on a RHEL 5

root@linux:~ # ls -l /dev/shm/sem.hpacu.appLock
-rw-r–r– 1 root root 32 Aug 16 05:21 /dev/shm/sem.hpacu.appLock

root@linux:~ # rm /dev/shm/sem.hpacu.appLock
rm: remove regular file `/dev/shm/sem.hpacu.appLock’? y

Checking LUN status in a HP Smart Array

To check a LUN that was created in a HP Proliant with Smart Array you need to have a package called hpacucli installed

root@linux:~ # rpm -qi hpacucli
Name        : hpacucli                     Relocations: (not relocatable)
Version     : 8.70                              Vendor: Hewlett-Packard Company
Release     : 8.0                           Build Date: Thu Dec  2 00:43:51 2010
Install date: Wed May 11 10:34:58 2011      Build Host: Prowl
Group       : Applications/System           Source RPM: hpacucli-8.70-8.0.src.rpm
Size        : 17788857                         License: See hpacucli.license
Signature   : (none)
Packager    : Hewlett-Packard Company
URL         : http://www.hp.com/linux
Summary     : HP Command Line Array Configuration Utility
Description :
The HP Command Line Array Configuration Utility is the disk
array configuration program for Array Controllers.
Distribution: (none)

Check which version you’re running

root@linux:~ # cat /etc/*release
SUSE LINUX Enterprise Server 9 (i586)
VERSION = 9
PATCHLEVEL = 3

Download it on this link: http://h18000.www1.hp.com/products/servers/proliantstorage/software-management/acumatrix/index.html

Install the package

root@linux:~ # rpm -ivh hpacucli-8.70-8.0.noarch.rpm
Preparing…                ########################################### [100%]
1:hpacucli               ########################################### [100%]

And run hpacucli

root@linux:~ # hpacucli ctrl all show config
Smart Array 642 in Slot 3                 (sn: P92260YXQT80I8)
array A (Parallel SCSI, Unused Space: 0 MB)
logicaldrive 1 (279.4 GB, RAID 1, OK)
physicaldrive 2:0   (port 2:id 0 , Parallel SCSI, 300 GB, OK)
physicaldrive 2:1   (port 2:id 1 , Parallel SCSI, 300 GB, OK)

Checking status of all controllers

root@linux:~ # hpacucli ctrl all show status
Smart Array 6i in Slot 0 (Embedded)
Controller Status: OK
Cache Status: OK

root@linux:~ # hpacucli ctrl all show config detail

Smart Array E200 in Slot 3
Bus Interface: PCI
Slot: 3
Serial Number: PA6C9%%BFTTEZI
Cache Serial Number: P9A3A0B9SUB9YB
RAID 6 (ADG) Status: Disabled
Controller Status: OK
Chassis Slot:
Hardware Revision: Rev A
Firmware Version: 1.82
Rebuild Priority: Medium
Expand Priority: Medium
Surface Scan Delay: 3 secs
Post Prompt Timeout: 15 secs
Cache Board Present: True
Cache Status: OK
Accelerator Ratio: 50% Read / 50% Write
Drive Write Cache: Disabled
Total Cache Size: 128 MB
Battery Pack Count: 1
Battery Status: OK
SATA NCQ Supported: False

Array: A
Interface Type: SAS
Unused Space: 0 MB
Status: OK

Logical Drive: 1
Size: 410.1 GB
Fault Tolerance: RAID 5
Heads: 255
Sectors Per Track: 32
Cylinders: 65535
Stripe Size: 64 KB
Status: OK
Array Accelerator: Enabled
Parity Initialization Status: Initialization Completed
Unique Identifier: 600508B100102542465454455A490012
Disk Name: /dev/cciss/c0d0
Mount Points: / 10.0 GB, swap 5.0 GB, /boot 513 MB
Logical Drive Label: A03C5226PA6C9%%BFTTEZI6260

physicaldrive 1I:1:1
Port: 1I
Box: 1
Bay: 1
Status: OK
Drive Type: Data Drive
Interface Type: SAS
Size: 146 GB
Rotational Speed: 10000
Firmware Revision: HPD6
Serial Number: BS05P880BW8H0834
Model: HP DG146BABCF
PHY Count: 2
PHY Transfer Rate: 3.0GBPS, Unknown
physicaldrive 1I:1:2
Port: 1I
Box: 1
Bay: 2
Status: OK
Drive Type: Data Drive
Interface Type: SAS
Size: 146 GB
Rotational Speed: 10000
Firmware Revision: HPDD
Serial Number: 3NM4P21D0000983193YT
Model: HP DG146ABAB4
PHY Count: 1
PHY Transfer Rate: 3.0GBPS
physicaldrive 1I:1:3
Port: 1I
Box: 1
Bay: 3
Status: OK
Drive Type: Data Drive
Interface Type: SAS
Size: 146 GB
Rotational Speed: 10000
Firmware Revision: HPD6
Serial Number: PCY2S4AE
Model: HP DG0146FARVU
PHY Count: 2
PHY Transfer Rate: 3.0GBPS, Unknown
physicaldrive 1I:1:4
Port: 1I
Box: 1
Bay: 4
Status: OK
Drive Type: Data Drive
Interface Type: SAS
Size: 146 GB
Rotational Speed: 10000
Firmware Revision: HPDD
Serial Number: 3NM4LJ4Y00009831MEQU
Model: HP DG146ABAB4
PHY Count: 1
PHY Transfer Rate: 3.0GBPS


Quick cheat sheet on how to use the hpacucli taken from http://www.datadisk.co.uk/html_docs/redhat/hpacucli.htm

Utility Keyword abbreviations

Abbreviations chassisname = ch
controller = ctrl
logicaldrive = ld
physicaldrive = pd
drivewritecache = dwc

hpacucli utility

hpacucli # hpacucli# hpacucli helpNote: you can use the hpacucli command in a script

Controller Commands

Display (detailed) hpacucli> ctrl all show config
hpacucli> ctrl all show config detail
Status hpacucli> ctrl all show status
Cache hpacucli> ctrl slot=0 modify dwc=disable
hpacucli> ctrl slot=0 modify dwc=enable
Rescan hpacucli> rescanNote: detects newly added devices since the last rescan

Physical Drive Commands

Display (detailed) hpacucli> ctrl slot=0 pd all show
hpacucli> ctrl slot=0 pd 2:3 show detailNote: you can obtain the slot number by displaying the controller configuration (see above)
Status hpacucli> ctrl slot=0 pd all show status
hpacucli> ctrl slot=0 pd 2:3 show status
Erase hpacucli> ctrl slot=0 pd 2:3 modify erase
Blink disk LED hpacucli> ctrl slot=0 pd 2:3 modify led=on
hpacucli> ctrl slot=0 pd 2:3 modify led=off

Logical Drive Commands

Display (detailed) hpacucli> ctrl slot=0 ld all show [detail]
hpacucli> ctrl slot=0 ld 4 show [detail]
Status hpacucli> ctrl slot=0 ld all show status
hpacucli> ctrl slot=0 ld 4 show status
Blink disk LED hpacucli> ctrl slot=0 ld 4 modify led=on
hpacucli> ctrl slot=0 ld 4 modify led=off
re-enabling failed drive hpacucli> ctrl slot=0 ld 4 modify reenable forced
Create # logical drive – one disk
hpacucli> ctrl slot=0 create type=ld drives=1:12 raid=0# logical drive – mirrored
hpacucli> ctrl slot=0 create type=ld drives=1:13,1:14 size=300 raid=1# logical drive – raid 5
hpacucli> ctrl slot=0 create type=ld drives=1:13,1:14,1:15,1:16,1:17 raid=5Note:
drives – specific drives, all drives or unassigned drives
size – size of the logical drive in MB
raid – type of raid 0, 1 , 1+0 and 5
Remove hpacucli> ctrl slot=0 ld 4 delete
Expanding hpacucli> ctrl slot=0 ld 4 add drives=2:3
Extending hpacucli> ctrl slot=0 ld 4 modify size=500 forced
Spare hpacucli> ctrl slot=0 array all add spares=1:5,1:7